Domoticz: Difference between revisions
Jump to navigation
Jump to search
No edit summary |
No edit summary |
||
| Line 30: | Line 30: | ||
[[File:Add_mqtt.png|800px]] | [[File:Add_mqtt.png|800px]] | ||
With name: LocalMosquitto | :'''With name: ''LocalMosquitto''''' | ||
Remote address: localhost | :'''Remote address: ''localhost''''' | ||
Port: 1883 | :'''Port: ''1883''''' | ||
'''IMPORTANT: The data timeout left disabled, because the Domoticz will be very-very unstable if enabled that''' | :'''IMPORTANT: The data timeout left disabled, because the Domoticz will be very-very unstable if enabled that''' | ||
Revision as of 11:10, 17 April 2017
How to install Domoticz
Linux/Ubuntu/Raspberry:
Just simply copy this command:
sudo curl -L install.domoticz.com | bash
After this install latest the Mosquitto MQTT broker:
add-apt-repository ppa:mosquitto-dev/mosquitto-ppa
sudo apt-get update
sudo apt-get install mosquitto mosquitto-clients python-mosquitto python3-mosquitto libmosquitto-dev libmosquitto1 libmosquittopp-dev libmosquittopp1
The Mosquitto broker add yourself into the startup list in under the installation.
Very usefull if you install the Avahi daemon to get your Raspberry's .local name:
sudo apt-get install avahi-daemon
After both application is intalled and the Avahi is running you can open the Domotizc page at your Raspberry s IP http://raspberrypi.local:8080
First time config
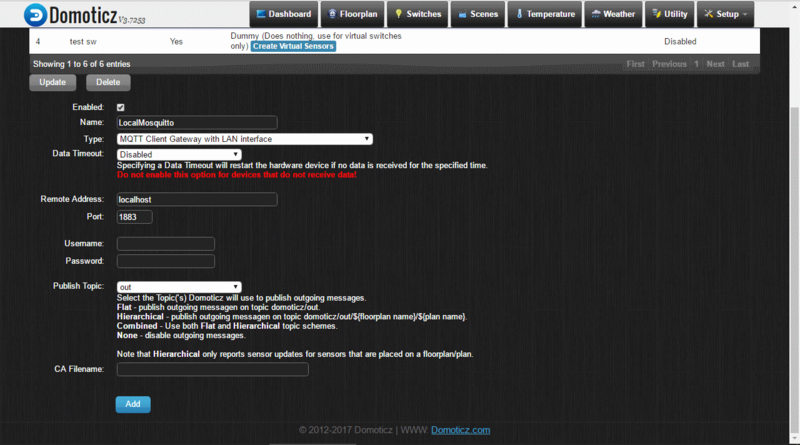
When open first time the Domoticz go to the Setup -> Hardware page and add a MQTT Client Gateway with LAN interface:
- With name: LocalMosquitto
- Remote address: localhost
- Port: 1883
- IMPORTANT: The data timeout left disabled, because the Domoticz will be very-very unstable if enabled that
